Designing the Perfect Modern Coastal Dining Room with Serena & Lily
This post may contain affiliate links, please read my disclosure policy.
Share
Modern Coastal Dining Room Reveal
If you’re looking to create a modern coastal dining room, we’ve got you covered with styling tips brought to you by Serena & Lily.
This post is sponsored by Serena & Lily. All thoughts and opinions are my own.
There’s nothing better than a great meal at the beach. That might be why modern coastal style is taking over countless dining rooms these days — even if they’re nowhere near the waves. This streamlined design style pulls inspiration from the coast or the sea itself, evoking a laid-back and relaxing feel that makes you want to sip your drink and stay a while, enjoying great conversation around the table.
Coastal interiors are light and bright spaces, filled with woven accents and seaside color palettes. For a modern spin on this classic look, pair your favorite coastal items with sleek pieces in high contrast colors like black or navy. That’s exactly what we did in a Fort Myers, FL dining room – the black Windsor-style chairs have become a crowd favorite! By opting for deeper tones in our chair selection, we brought a more masculine, textured look to an otherwise airy space.
Our dining room space is fairly large, so we also selected an oversized light fixture and two chunky woven chairs for each end of the dining room table. This grounds the table in the room and offers more of that great texture I love so much.
No matter what you love about the modern coastal look, Serena & Lily offers the perfect selections, from quality furniture that will last for years to come to accent pieces that tie the entire space together with gorgeous blues and whites, and those woven textures that epitomize coastal style.
How to Design a Modern Coastal Dining Room
Before you shop, make sure to plan out your new dining room design. Selecting pieces and colors that work well for your space and your needs will give you a seamless design process from start to finish — and you’ll love the finished result for countless dinners to come!
Do you have enough space for your idea?
Always measure before you purchase a single thing! Mapping out your room ensures that your furniture fits and flows with the room. Nothing will look beautiful or function well if your room is too crammed or too bare. Don’t forget to consider table and chair height — chairs should always fit comfortably underneath your dining table.
How will you use your space?
Not all dining spaces are used in the same way, so it helps to consider whether you’ll be using the room for casual dining or formal dining, everyday quick meals or large gatherings that last for hours. (If it’s the latter, you’ll want to prioritize comfortable seating!) If you’re short on space, consider an expandable table for those special occasions. In all of your dining room selections, remember to combine beauty with functionality.
Does this style work in my home?
Before your modern coastal renovation, consider your home’s current style and color palette. This is especially important with open floor plans! If your home already has lots of light and airy spaces, blue and white tones, or woven neutral textures, a modern coastal dining room is the perfect addition. If not, you may be looking at a larger restyling in the future.
In this Florida home, we stuck to a modern color scheme of warm wovens, white, navy and black that flows from the dining room into the open floor plan kitchen and family room.
How to Furnish Your Modern Coastal Dining Room
Once you have your measurements and you’ve decided how to best use your space, it’s time to get specific as you build a room around your favorite pieces! If you’re unsure where to start, here are a few things I always look for in any modern coastal space.
Play with textures and blue tones.
There’s nothing more quintessentially coastal than the ocean, and thankfully, there are a huge selection of blues to choose from! Keep it light and bright, or use deeper tones for modern, masculine look. Woven textures and rattan pieces bring to mind the natural textures and colors you’d find on the coast, too.
Choose low maintenance and easy-to-clean options.
The laid-back coastal vibe means keeping your furniture fuss-free! Pick pieces that can handle the elements, from kids’ dropped bites of food to the outdoor elements. When you choose performance fabric, you can sleep peacefully knowing even white chairs are easy to clean. Furniture that can be easily wiped off will guarantee a low-maintenance lifestyle.
Complete the look with well-appointed accessories.
You might be surprised to find that a few home decor accents can completely transform your dining room into a dreamy coastal space. Serena & Lily offers amazing coastal-inspired pieces that are both beautiful and functional, from these amazing seagrass-wrapped glasses (removable for easy cleaning — because low maintenance is always best!) to this sleek white footed fruit bowl that makes a gorgeous centerpiece or buffet table accessory.
I also love to add texture where my feet are, like this gorgeous navy rug with neutral woven accents. Whatever you choose, combining modern and traditionally coastal accents will give your dining room a curated feel that’s unique to your own taste.
Our Serena & Lily Modern Coastal Dining Room Before & After
To see even more of my favorite Serena & Lily pieces, check out our modern coastal dining room before and after!
We paneled the back wall to create a focal point that visually separates the dining room from the other spaces in this open floor plan, and we chose high contrast colors to give the room a modern edge, mixing whites and warm neutrals with deep blues and inky blacks. Some of my personal favorite touches: the coconut beads on the chandelier and the mango wood of these beachside bowls.
Creating a Color Palette for Your Home That Works (+ Cabin Update)
This post may contain affiliate links, please read my disclosure policy.
Share
Picking out your home color palette can feel intimidating — you don’t want to go too bold or too boring. Here’s my approach as a designer!
How to Create a Color Palette for your Home
I used this fool-proof process to curated a color palette for our cabin that’s not only beautiful, but that complements our lifestyle.
It’s easy to scroll through Pinterest boards or blog posts and fall in love with dozens of paint colors – ask me how I know. But before you order sample cans or start to compare swatches for your own home, it’s important to narrow down that wide swath of inspiration into a color palette that will work for your home and create spaces that flow seamlessly together.
Identifying a color palette for your home or project should be step one – or at least really close to it! I promise it will make the whole process easier.
When I’m refreshing or redesigning a room, I settle on a general color long before I sample individual shades, considering the colors already used throughout the home as my starting point. And if I’m designing a whole house? After gathering inspiration, my first step is choosing a general color scheme that’s complementary.
How to Build a Paint Color Palette for Your Whole Home
Creating a cohesive paint palette is important – if you don’t select colors that flow well from room to room, your space will feel disjointed and unconnected. Of course, it’s totally fine to choose a variety of shades, or even completely different paint colors! It’s not about uniformity – it’s about creating great transitions.
Thankfully, there are lots of ways to create color flow. The simplest one: pick a paint color card and just go with lighter or darker shades from that same card. If you’re feeling adventurous, you can also put paint cards together to see how they play with one another.
Here’s my foolproof process for finding a color scheme that plays well in every room of any home!
Some of the inspiration for our Belgian Treehouse Project.
1. Gather inspiration.
This process looks different for everyone, but when you start to look for it, you’ll be surprised where you find it! You could find the palette of your dreams in a coffee table book, a restaurant or boutique, or even the colors of the landscape during an evening walk.
Still stumped? Pin, pin, pin. Hop on Pinterest and pin anything that speaks to you. After you’ve curated a good collection, go through them and study the images to find repeating patterns.
Are there a ton of white rooms? You must like white rooms! Notice navy popping up throughout your board? Navy cabinets, or even painting a smaller room navy, would likely be a win for you.
If Pinterest hasn’t quite narrowed things down for you, check your own closet. You’ll likely feel at home using similar colors to what you tend to wear.
2. Choose a starting shade and build around it.
Once your inspiration is set, hone in on one thing you truly love. It could be one image from your pin board, your favorite color, a flower arrangement, or a textile you know you’ll be using in your new space and choose that as a starting point.
Once you’ve selected your starting shade, build your palette with 4 colors: one neutral you really love, and three shades that complement it well. Three is a balanced number — it keeps things consistent, but interesting. In my own design, I find myself drawing on colors I find in nature all the time! I love to find a neutral or white base and add in dusty, earthy colors that are calming and add depth.
After your “core four” color palette, you can add in as many more tones as you want! In my Fargo home, I used lots of different complementary colors, keeping things neutral in the main living spaces and adding bold choices in the bedrooms and office. This created a dynamic look while still maintaining a house-wide flow.
A good rule of thumb: repeat your accent colors at least once in your home to give some overall consistency — but don’t feel like you have to stick to paint!
Think of our navy example from earlier. You may choose to paint your powder room navy for a moody feel, but you don’t want your larger spaces to feel darker. That’s a wise choice! But you can bring navy into your other spaces through artwork, throw pillows, or lamps. You can also find wallpaper or an area rug that has navy accents running through it.
3. Consider lighting, sight lines, and mood.
Depending on your floor plan, you may be able to see many rooms from a certain vantage point. If that’s the case, you’ll want to take extra care to select complementary colors that don’t interrupt your sight lines and create a space that feels disconnected. This is the reason I’m a huge fan of keeping hallways and main living areas mostly neutral, experimenting with bold color choices in rooms that can be closed off or have a clear division, like bedrooms or offices.
Don’t forget, your color palette impacts the feel of your space and how you feel in it. If you’re looking for a laid-back, relaxed feel, you may want to opt for a lighter color scheme, while warm, dark colors create a cozy, moody vibe.
After you’ve followed these three steps, paint some samples on your wall to make sure that your selections play well together and that you’ll love them for years to come! Need some help determining how to pick the best shades? I wrote about that very thing recently.
The Before
The cabin has great bones, but the pine walls felt a little dark and rustic for our taste.
How I Built My Cabin Home Color Palette
Here’s how this process worked for my latest project, our family cabin! Before the renovation, the cabin felt homey, but dated – and very rustic, which is great but not what we are after. All of those dark, warm colors didn’t highlight the space’s architecture in the way I felt it deserved, so I got to work finding inspiration for a new look in this space.
I was immediately drawn to European design, especially Belgian farmhouses. I didn’t want the space to feel brand new – I wanted to feel like it was timeless, but not dated, and the #BelgianTreehouse (our hashtag!) was the perfect way to do just that. I found a gorgeous mural wallpaper we hope to eventually use in the primary bedroom and used it as my jumping off point for the entire palette, pulling colors from it for the walls. I selected warmer whites and muted accents for a soft, classic feel.
The result? A house color palette of warm white walls and ceilings, paired with beige trim and a soft blue accent color. Here are the exact shades we used, and why we used them:
White: Benjamin Moore Swiss Coffee
This is a sophisticated, warm white paint color. It’s welcoming, but still light and bright. It’s a true cream, but it doesn’t pull yellow, which was important to me.
What we were looking for: A neutral that’s not overly sterile and paired well with the rest of the color palette, as well as the home’s existing wood tones.
Where we used it: Basement walls and throughout the main floor: the living areas, halls, and bathroom, as well as in the primary bedroom.
All the walls in our main living space are painted Benjamin Moore Swiss Coffee. For white paint, I tend to prefer Benjamin Moore over Sherwin Williams paint.
Greige: Farrow & Ball Shaded White
This light greige (gray-beige) doesn’t read too warm or too cool, taking its name from the soft tone created when whites are used in deeply shaded spaces.
What we were looking for: a beige or gray that would look good on trim in an older home. We were looking for a color that offered a soft but noticeable contrast with our warm whites.
Where we used it: All the doors on the main floor and trim throughout the main living areas. We plan to use it for the kitchen cabinetry, too!
White: Benjamin Moore Simply White
This is a crisp, clean, warm white – it’s barely antiqued, so it reads as more of a white in most rooms. In lighting situations where a true cream would feel too yellow, Simply White is a great fit.
What we were looking for: A white for the ceilings that felt crisp, but not stark. (Don’t forget: the ceiling is part of your color palette too! Sometimes, I even paint the ceiling to match the walls in a space.)
Where we used it: All ceilings that weren’t paneled.
Gray: Benjamin Moore Boothbay Gray
This beautiful blue gray shade works well in most lighting situations – plus, it’s very versatile. Pairing it with a cool tones brings out its stunning blue, while pairing it with warmer shades tends to tone it down.
What we were looking for: My kids wanted a blue room, and I wanted a shade that went well with the soft, pared down color palette I had planned for the rest of the main floor.
Where we used it: On the trim and walls in the kids bunk room. We went monochromatic for a classic but unfussy look.
Progress
Before the walls were painted a slate blue. While the tone of the walls only changed a bit, the biggest transformation came in the form of monochromatic trim.
If you want to make sure you remember your picks, head here for my Paint Color Chart, a free downloadable chart for you to track your own home’s paint colors, helpful for touch ups or just for general knowledge! (Next time you need to touch up your family room or dining room wall, you’ll know exactly what color you need!)
This post may contain affiliate links, please read my disclosure policy.
Share
Stop second guessing what paint you used in your home! Get organized with our free paint color chart. It’s and easy way to keep track of the brand, color and finish of all the paint throughout your house.
If you’ve ever touched up a paint color in your house and then realized it was the completely wrong paint, you know how important it is to track your paint colors. I have most of my paint colors memorized, but it’s the brand and sheen that get me. Painters often color match paint and use the brand they prefer. Then when I pick up the brand I think it is to do touch ups, it can cause problems. I’ve learned my lesson and now I track what brand the painter uses so I don’t make any mistakes when touching it up.
But that’s not the only paint touch up mistake I’ve made. One time I touched up the trim in my house and after it dried I realized I had used the wrong sheen! I also have no clue what color the back of the book case in my living room is. Luckily it’s never needed a touchup.
After a few too many mistakes, I created this paint color chart to keep track of all the colors in my house. I also happen to have my paint colors listed for you room-by-room here.
How to Use Our Free Paint Color Chart
In the free paint color chart, you’ll find a space for room, color, brand, sheen and notes. Just print it out, write down the information for each room and keep in a safe space. You’ll never find yourself second guessing if your using the right paint again! In the note section, you may want to include the year the paint was purchased.
You can download your complementary Paint Color Chart here. I have mine pinned on my bulletin board so I can avoid future mishaps!
This print out is also great for brainstorming potential colors to paint your home. Track the colors your interested in using then bring it with you to the paint store to pick up samples.
Looking for the perfect white paint? Sign up to get our 6 favorite white paints sent straight to your email below!
This post may contain affiliate links, please read my disclosure policy.
Share
Our fresh and easy yogurt parfaits are filled with fresh fruit, honey and a rich, chocolate granola. They make for a healthy breakfast, but are 100% dessert worthy too!
Yogurt parfait sounds super fancy, but it’s really just yogurt layered with fresh fruit and crunchy granola. Translation – They’re a quick and easy way to start your day.
Not only are yogurt and fruit parfaits delicious, they provide things are bodies crave like vitamins, calcium, and protein. They’re especially great for growing kids and make for a balanced and delicious breakfast. No guilt required!
My parfait recipe is made with Greek yogurt, a little drizzle of honey, lots of fresh berries and homemade chocolate granola. You can enjoy my yogurt and granola parfait cups for breakfast, lunch, or for dessert! They also make a wonderful on-the-go snack.
This recipe also makes a beautiful, eye-catching breakfast charcuterie board for parties. Fill the board with yogurt, granola, honey, nuts and fruit, then let your family or guests serve themselves.
Ingredients for Yogurt & Fruit Granola Parfaits
You only need 4 ingredients to make my yogurt parfaits and they’re completely customizable. Feel free to play with the recipe and make it your own. If you do, tell me how it went in the comments below.
I like to keep the ingredients for this recipe on hand so that putting them together takes a matter of moments. I’m terrible at eating breakfast, but I can easily make a yogurt parfait and run out the door with it!
Yogurt: I prefer to use non-fat plain Greek yogurt because it’s thick and creamy and layers well. Plus, it’s delicious tang contrasts nicely with the natural sweetness of the fruits and granola. If you prefer a sweeter taste try Vanilla Greek yogurt. You can use natural or flavored yogurt, but the parfait might not hold it’s shape as nicely.
Honey: This is optional, I love using a drizzle or two for extra sweetness. As an alternative to honey you can try maple syrup, jam or fruit compote.
Fresh fruit: I use a mixture of bananas, grapes, blackberries, strawberries and blueberries, but you can use your favorite fruit! The more colorful the better and remember fresh fruit is best! Wash, dry and cut your fruit if needed for easy eating.
Granola: I prefer to use homemade granola for a delicious and crunchy texture.
What Makes Our Yogurt Parfait Recipe the Best?
There are a lot of yogurt parfait recipes out there and it’s hard to mess up this fresh and easy breakfast. But our recipe has a secret ingredient that makes it stand out from the crowd.
Hint… it deliciously crunchy and involves chocolate.
The secret ingredient is our homemade chocolate granola! Our rich, chocolate chip granola recipe is as easy to make as it is to eat. This recipe takes chocolate and infuses it into a yummy pantry staple. It’s made from oats, nuts, coconut, cocoa powder, maple syrup and sea salt.
I make this homemade granola ahead of time, then store it on the counter in an airtight container for easy access. I prefer homemade granola for yogurt parfaits because you know exactly what is in them and can eliminate any unnecessary sugars. Homemade granola doesn’t get better than this one!
Yogurt Parfait Variations
A beautiful thing about yogurt parfaits is they’re very flexible. I like to make my granola from scratch, but you can use all store-bought ingredients too. I recommend this store-bought Chocolate Granola.
You can easily adapt this recipe by adding or replacing ingredients. The sky’s the limit here. Here a few ideas:
Add a layer of lemon curd or strawberry jam.
Use one type of fresh berry, like all strawberries, all blueberries or all blackberries.
Go tropical with a banana, mango, kiwi or pineapple combination.
Top with coconut flakes, whip cream or mini chocolate chips.
Use apples dusted with cinnamon instead of berries.
Storing Your Yogurt Parfait
Yogurt parfaits are easy to make on a busy day, or even a day or two before. You can store them in the refrigerator in glass jars with lids for up 3 days.
Can I make my yogurt parfait ahead of time?
Yogurt parfaits can be made ahead and will keep well in the refrigerator. But after about 24 hours the granola will start to get a little soggy. If you make these more than one day ahead, leave out the granola. Then add it on the day you eat it.
We love using grapes in a fresh parfaits. However, we’ve found that when they’re added to make-ahead parfaits, the grape juices run considerably more. You may want to skip grapes if you’re making them ahead of time.
Can you freeze yogurt parfaits?
No, it’s best not to freeze this recipe. Plus it’s not necessary. Parfaits are already simple to make and can be made in less than 5 minutes.
How to Make a Yogurt Parfait with Fruit & Chocolate Granola
Whether you’re whipping one together or preparing them ahead of time, yogurt parfaits are incredibly simple and easy to make.
To assemble. take a small glass jar and add a thin layer of creamy yogurt to it. Then drizzle over some honey. Next add some chopped fruit as the second layer followed by a couple of spoonfuls of chocolate granola.
Repeat the layers until the glass jar is full.
That’s it! Then all that is left to do is to enjoy!
First
Add a thin layer of yogurt to small glass jar, then drizzle with honey. Tip: Spread each layer so they touch the glass, then you will be able to see all the delicious layers.
Then
Add your favorite chopped fruit! We like berries mixed with bananas and grapes.
Next
This is our favorite step! Add our delicious chocolate granola! Then repeat each step, starting with the yogurt.
Finally
Keep layering until your glass is deliciously full!
Fruit, Granola & Yogurt Parfait FAQs
Are yogurt parfaits healthy?
My recipe is low in calories and pretty healthy, though it does include chocolate chips in the granola.
Whether your yogurt parfait is healthy or not really depends on the ingredients used. Yogurt parfaits are usually an excellent source of fiber and protein. They’re also a good source of calcium, and provide good bacteria to boost your immune system.
But some yogurt parfaits have a high amount of fats and sugar. To guarantee a healthy parfait, it’s best to make your own so you know exactly what ingredients were used.
Can I substitute frozen berries for fresh fruit?
You can use frozen berries in the parfaits. However, as the berries thaw the juices will seep into the yogurt. The cups will contain more fruit juices. I suggest sticking with fresh fruit for this reason.
Can I make this into a granola and yogurt bowl?
I don’t see why not! There is no need to layer yogurt with fruit and granola. Place yogurt in a bowl than top with fruit, granola and a drizzle of honey.
Who doesn’t love any easy breakfast? If you try my yogurt parfait recipe, please come back to share using my 5-star rating in the comments below.
Our fresh and easy yogurt parfaits are filled with fresh fruit, honey and a rich, chocolate granola. They make for a healthy breakfast, but are 100% dessert worthy too!
To assemble the yogurt parfait take a small glass jar add a thin layer of yogurt to it and drizzle over some honey.
Next add some chopped fruit as the second layer followed by a couple of spoonfuls of chocolate granola.
Repeat the layers until the glass jar is full.
Serve and enjoy.
Notes
This recipe is vegetarian.Serving suggestion: This recipe works great as a breakfast charcuterie board. Place ingredients on a large board until full.Storage: Store in glass jars with lids in the refrigerator for 3 days.If making ahead: After about 24 hours the granola will start to get a little soggy. If you make these more than a day ahead, leave the granola out. Then add it on the day you eat it.Fresh vs. Frozen Fruit: You can use frozen berries in the parfaits. However, as the berries thaw the juices will seep into the yogurt. The cups will contain more fruit juices. I suggest sticking with fresh fruit for this reason.
This post may contain affiliate links, please read my disclosure policy.
Share
Homemade chocolate granola will become your favorite crunchy breakfast treat or afternoon chocolate snack. This rich, chocolate granola recipe is as easy to make as it is to eat, pairing beautifully with your morning yogurt or even as an ice cream topping.
This granola recipe takes chocolate and infuses it into a yummy pantry staple. Not to mention it tastes great! It’s made from oats, nuts, coconut, cocoa powder, maple syrup and sea salt.
You can eat as a snack, by itself or as a perfect topping on your morning yogurt parfait. The options are endless!
Homemade chocolate granola is also fairly simple to make and requires only about 10 to 15 minutes of effort.
Some other things you’ll love about homemade chocolate granola:
It’s deliciously crunchy.
It’s protein and fiber rich.
You can easily customize it!
It has a great nutty flavor.
It’s chocolate flavor is perfectly sweet!
Ingredients Needed for Chocolate Granola
Nuts: I use Brazil nuts, pecans and hazelnuts, and then crush them using a rolling pin. However, feel free to use your favorite nuts and slice, sliver or roughly chop them.
Coconut flakes: I love pairing coconut with chocolate, but you could also add raisins, sunflower seeds, chia seeds, dried cranberries, chopped dried figs or really any dried fruit for added flavor.
Sea salt: I love the combo of flakey sea salt with chocolate. You can leave it out if you don’t like a salty-sweet combination, but I recommend still using a pinch of table salt to balance the flavor.
Oats: I prefer to use whole, rolled oats. If you want this recipe to be gluten-free, make sure your oats are certified GF.
Brown sugar: This adds flavor and helps the granola clump. However, you can substitute it for more maple syrup if you prefer.
Coconut oil: This may add a tiny bit of coconut flavor to your granola. If you’re looking for an alternative a light olive oil would also work.
Maple syrup: This adds sweetness while keeping this granola recipe on the healthier side. However, you can swap this out for honey or golden syrup.
Semi-sweet chocolate: I like to use a mixture of hand chopped chocolate and classic chocolate chips, just make sure the total of both adds up to 1/2 cup. Roughly chop your chocolate bar into small pieces. High-quality chocolate bars are usually found right next to the chocolate chips at your local grocery store.
Absolutely. You can use any combination of nuts just stick to the measurement of 1 1/2 cups in total.
I have a nut allergy. Can I make this without nuts?
If you have a nut allergy or simply want to make this chocolate granola recipe nut free, you can omit the nuts and increase the oats by 1 1/2 cups.
How long does chocolate granola last?
If your store your chocolate granola in an airtight container at room temperature, it should keep for 4 weeks.
I like my granola crunchy. Any tips?
The larger the baking sheet the crunchier this granola will turn out. But make sure to bake your chocolate granola on a low heat, as nuts can burn easily, especially if they are small. Check your granola midway through baking when you’re moving the outside of the granola in to avoid over baking.
How should I serve chocolate granola?
There are a ton of options! Serve homemade chocolate granola with cold almond milk or greek yogurt mixed with a little bit of vanilla extract. It’s also nice to add fresh fruit, like my favorite, blackberries & blueberries. You can turn it into a fruit parfait. You can even use it as a healthy ice cream topping or you can enjoy it just as it is!
For a quick snack, roll bananas in peanut butter or any nut butter and then top them with the chocolate granola.
My favorite way to serve chocolate granola is as part of a breakfast charcuterie board, with yogurt, fruit and more!
How can I make this chocolate granola recipe healthier?
This recipe is already pretty healthy. It’s filled with protein and fiber. However, you can omit the sugar completely for an even healthier version. If you do, just realize, it will taste slightly bitter due to the cocoa powder.
Can I make this into vegan chocolate granola?
Yes, it’s easy to make this recipe vegan. Since some brown sugar is not vegan, just make sure you use coconut sugar or organic cane sugar. Then be sure to chose vegan semi-sweet chocolate.
Can I freeze homemade granola?
No. This recipe is not suitable for freezing.
How to Make Homemade Chocolate Granola
Step 1
Preheat the oven to 300 F. Line a large baking sheet with parchment paper.
Step 2
Add the nuts to a clean kitchen towel, wrap them up then bash them with a rolling pin until they are broken up into smaller pieces.
Step 3
Add the nuts, coconut flakes, salt, oats, cocoa powder and sugar to a large bowl and mix well until all the dry ingredients are coated with the cocoa powder.
Step 4
Put the coconut oil and maple syrup into a small saucepan set over a low heat and melt.
Step 5
Pour the melted coconut oil mixture into the oats mixture and mix very well until all the ingredients are coated with the oil mixture.
Step 6
Transfer to the baking sheet and use a spoon to spread into an even layer.
Step 7
Bake in the center of the oven for 30-40 minutes. Halfway through the baking time move the granola on the outside edge of the pan into the center and spread back into an even layer.
Step 8
Once baked the granola will look darker in color and feel dry when you touch it.
Step 9
Set aside to cool completely .
Step 10
Once cool, scatter over the chopped chocolate and chocolate chips, then mix to combine.
Step 11
Transfer the granola to an airtight jar and store at room temperature where it will keep for 4 weeks.
Step 12
Serve with cold milk or greek/natural yogurt. It’s also nice to add fresh fruit to serve but feel free to enjoy this chocolate granola just as it is!
If you try my homemade chocolate granola recipe for breakfast or a snack, please come back to share using my 5-star rating in the comments below!
Then, if you love chocolate make sure you try out the recipes below.
Hungry for more recipes and home tips? Sign up for my newsletter to get amazing content sent directly to your mailbox.
Easy homemade chocolate granola will become your favorite crunchy breakfast treat or afternoon chocolate snack. It pairs beautifully with your morning yogurt or even ice cream as a delicious but healthy topping.
Preheat the oven to 300°F. Line a large baking sheet with parchment paper.
Add the nuts to a clean kitchen towel, wrap them up then bash them with a rolling pin until they are broken up into smaller pieces.
Add the nuts, coconut flakes, salt, oats, cocoa powder and sugar to a large bowl and mix well until all the ingredients are coated with the cocoa powder.
Put the coconut oil and maple syrup into a small saucepan set over a low heat and melt.
Pour the melted coconut oil mixture into the oats mixture and mix very well until all the ingredients are coated with the oil mixture.
Transfer to the baking sheet and use a spoon to spread into an even layer.
Bake in the center of the oven for 30-40 minutes. Halfway through the baking time move the granola on the outside edge of the pan into the center and spread back into an even layer.
Once baked the granola will look darker in color and feel dry when you touch it.
Set aside to cool completely.
Once cool, scatter over the chopped chocolate and/or chocolate chips, then mix to combine.
Transfer the granola to an airtight jar and store at room temperature where it will keep for 4 weeks.
Serve with cold milk or greek/natural yogurt. It’s also nice to add fresh fruit to serve but feel free to enjoy this chocolate granola just as it is!
Notes
This granola is used in my Yogurt Parfait with Fruit & Chocolate Granola recipe.Baking Tip: The larger the baking sheet the crunchier this granola will turn out.Storage: Store in an airtight container at room temperature where it will keep for at least 4 weeks. Not suitable for freezing.
This post may contain affiliate links, please read my disclosure policy.
Share
There’s nothing better than a crisp new coat of paint in a beautiful space. But there’s nothing more overwhelming than trying to choose that perfect shade, right? I’ll admit, choosing paint colors can be tricky, but today, I’m here to offer all my tips and tricks for how to choose a paint color for your interior refresh without getting stuck comparing endless options and swatches.
No Stress Interior Paint Guide
Choosing interior paint colors isn’t always as straightforward as you’d think — get all the steps for how to choose the best paint color from an interior designer!
My No-Stress Guide to Selecting Interior Paint Colors
Follow these four steps for a no-fuss paint selection!
Step 1: Gather inspiration before choosing paint colors.
If you’re reading this as you’re heading into a paint store, stop! It will be nearly impossible to pick out the right paint color if you’re not sure what you’re looking for yet. Instead, take stock of the space you have and search for inspiration that will turn it into the space you want.
Whether you’re painting a new home or starting a remodeling project, it’s important to get inspired and create a design plan before you even glance at paint samples. First, determine the mood and color family for the space. Want the room to feel airy and refreshing? A lighter and brighter wall color is the way to go. Looking for a relaxed, cozy, moody vibe? A darker paint may be the answer.
As you scroll through Instagram or Pinterest, or flip through the latest design magazine, save spaces that catch your eye and offer the mood you’re going for in your own home. You can even shop my home to find all of my personal paint selections! Chances are, you’ll begin to see similar colors and tones in the photos you save – and that’s a great place to start with your own room design.
Paint Colors
We used this process when choosing colors for our #BelgianTreehouse. The walls are Benjamin Moore Swiss Coffee and the trim and doors are Farrow & Ball Shaded White.
Step 2: Decide what shades to sample.
If you’re painting a space that’s already furnished, build on what you already have! Determine which pieces you’re keeping, and make sure the paint you choose complements the colors of what’s already in the room, from furniture to rugs to artwork you really love. Don’t forget to factor in the “permanent” features, too – if the flooring, stone fireplaces, and light fixtures are staying, let them serve as anchor points for your color scheme.
Once you have a general color selection in your mind, it’s finally time to search for sample shades. Search online for the names of paint colors from your inspiration board, or head directly to the store to look at paint chip cards. If you’re using a contractor for your project, make sure to ask them if they have a preferred vendor. Paint stores can color match other brands using a sample or color codes stored in their computer, but it’s not an exact science.
I always recommend sampling paint colors in the brand you plan to use as “Plan A.” I’m not against color-matching at all – I do it often! But remember, this is your stress-free guide, so I’m trying to make things as simple as possible. If you do need to color match, do so during the sampling process. Nobody likes a mismatched surprise once the color is on the walls!
You might be thinking…
“How many samples should I select, anyway?”
It’s a great question, and there’s no perfect answer! I usually sample 6 shades when choosing a paint color, which is definitely more than the average.
I would always suggest sampling at least 3 colors, expecting to pay about $5 per sample can. (And yes, I’m a huge advocate for true paint samples from the can, because they’re more reliable. In a pinch, though, you can typically get paint swatch stickers online.)
Step 3: Sample your swatches.
The only way to find the perfect paint for your space is by swatching, swatching, and swatching again. I’ve found that it’s typically easy to name your favorites as soon as the paint has dried (which, by the way, is 2+ hours after the second coat has been applied), but my best practice recommendation is to live with it for a day or two before making a final decision. See how the paint looks during different times of the day – it’s amazing how much light can change a color sometimes!
If your house is mid construction and you can’t sample the paint directly on the wall, try to get your hands on some sheetrock. Your contractor can usually provide you with a piece. In a pinch, some coated poster board will do, but paint absorbs into paper a little differently than walls.
Bonus: samples painted on sheetrock scraps or poster board can be helpful when choosing paint for an entire home, since you can move your samples around to see the paint color in different spaces.
Tips For Sampling Paints
Paint you samples directly on the wall. You’ll need at least 2 coats and remember bigger is better, 1 foot x 1 foot is a good place to start. Our beige paint samples are a little smaller here as they are for the trim.
Step 4: Pick a paint color.
You did it! You made it to the best part of the process – selecting your favorite sample and watching it transform your space. As you’re making your final selection, here are a few tips to keep in mind.
Make your selection based on your home’s light.
It may sound obvious, but it’s easy to overlook the way light can change the look of a paint. Make a note of directional light – natural southern light will bring out the warm tones in a space, while northern light is bright and cool. This is why you need at least a full 24 hours with your samples.
How do they look in the morning? At noon? At sunset? What about after dark, with just a few lamps to illuminate the space?
The Power of Paint
A fresh coat of paint completely transformed our Belgian Treehouse Project. Did you use our paint tips? Share your refreshed spaces with us on Instagram at #PrettyDomesticated.
Don’t forget about undertones.
This is true with all paint colors, but it’s especially important if you’re choosing a white shade for your home. There are a few pure and clean whites on the market, but most white paints lean warm (yellow, pink, or beige undertones) or cool (blue and gray undertones). Pure, warm, and cool whites are all wonderful options – but which option is best for you?
Remember: Warm whites work great for rooms without a lot of natural light, and they also make large spaces feel cozier. Cool tones work well in modern spaces with an abundance of natural light. If you need help selecting a shade, subscribe to my newsletter to get your FREE white paint guide! It’s a great place to start.
And there you have it – our no-stress guide for how to choose interior paint colors you’ll actually love. I can’t wait to see what you pick for your next project!
How to Style Your Home & Shop Like an Interior Designer
This post may contain affiliate links, please read my disclosure policy.
Share
Shop Like an Interior Designer
Wish your home had a more cohesive look? I’m sharing my secrets for how to style your home & shop like an interior designer!
How to Shop for Furniture Like an Interior Designer
Have you ever shopped for furniture online? It seems overwhelming at first — but after visiting a few sites, I bet you’ve noticed the same pieces popping up time after time. Here’s a secret interior designers know well: there are a handful of manufacturers that produce furniture and decor overseas, and most brands import and source them from the exact same place. A simple name change and price markup, and boom: it’s listed in the inventory of various brands.
To be clear, seeing brands use similar (or the exact same) furniture vendor isn’t a problem, necessarily — but it is helpful information. As it turns out, a higher price doesn’t always indicate better quality.
This is actually a great reason to hire an interior designer for your next home project! We attend the same markets as those popular stores you love, and we love giving you the inside scoop about what’s worth the investment. Plus, we can often score an even better price for you!
When I see a product I like during an online shopping session, but don’t know who manufactured it, I take a screenshot and search that photo using Google Images. This simple trick usually takes me straight to the manufacturer, giving me all of the online purchase options so that I can grab the best deal.
And yes, you should absolutely borrow this tip! When you learn how to value where furniture is sourced rather than where it’s sold, you’ll be shopping like an interior designer in no time.
How to Design Any Space
Want a foolproof four-step process to incorporate high end design into your space without busting the budget? This is how I approach my projects, no matter how big or small.
1. Gather inspiration.
The design process never starts in a furniture store. Instead, spend time browsing Pinterest or Instagram, taking notice of what draws you in. When you see some themes emerge, make a mood board with Canva, InDesign, or even a good old-fashioned poster board! Include inspiration photos for furniture pieces, potential decor, colors, and even textures or fabrics.
Feeling stuck? Focus on a statement piece you adore and design the rest of the room around that item. As you’re browsing, don’t be afraid to mix styles, price points, and new and old pieces.
The magic is in the mix. And remember, not everything needs to be a star — in fact, when you highlight just a few key pieces, they’re more likely to truly shine.
2. Measure your space.
Don’t even think about hitting that “add to cart” button until you know the dimensions of your space and map out a furniture plan. This is the most important step in the interior design process, because it truly doesn’t matter how beautiful your furniture is if the shapes and sizes don’t fit well in the room.
Too large, and things will feel cramped and crowded. Too small, and the room will feel empty and uninviting. To avoid this, you can map out the space on graph paper — or, even better, if the room is empty, use blue painter’s tape on the floor to truly see how the space will flow.
3. Create your plan.
The first step in any great plan: a budget. Once you’ve established your total spend, you can write out a list of exactly what you need and select pieces that fit within your total! I typically take time to refine my design board until it includes the exact furniture pieces I’ll need — seeing them together gives me a better picture of how things will flow and complement one another. Next, I’ll price shop, tracking expenses on Excel as I purchase.
Remember: not every item purchased needs to be high end home decor. A splurge on a statement piece can be matched with more affordable items without detracting from the look and feel of the space. If you’re not sure where to start, I recommend choosing large furniture as investment items — particularly upholstered pieces and rugs. It can be costly to replace pieces like sofas, chairs, beds and rugs.
Save yourself the hassle and invest in high quality pieces that will stand the test of time. I often recommend that my clients choose neutral, durable upholstery for these statement pieces. With a neutral canvas, it’s easy to change the look or style of a room with accents without replacing expensive items.
4. Don’t forget to accessorize!
I’ve seen it happen countless times: someone has worked out their room budget to the very last penny, but none of those small decor details are listed, the ones that bring a space together and make it feel like home. As you make your budget, remember to include lamps, throws and pillows, coffee table decor, and vases, sculptures, or other interesting pieces that will add character to the room.
Shop Like an Interior Designer When You Buy from These Stores
If you’ve always wondered where interior designers buy furniture, you’re in luck! Here’s a list of my favorite spots at every price point.
Designer’s Shops
This is always my first “stop” online, because every item you find in a designer’s store has their stamp of approval, so I know it’s most likely going to be a high quality piece. Lots of designers even offer custom, exclusive pieces that will give my rooms a unique flair. My most-frequented shops:
These online stores offer customizations for many of their pieces, which allows me to select finishes and styles that will work best for the space! I also trust their quality.
Rejuvenation offers great lighting and hardware options
Lulu & Georgia always has a fantastic selection of area rugs and high-quality furniture
Serena & Lily has the perfect laid-back coastal style
Annie Selke’s rugs in classic graphic patterns are durable and will last for years
“Big Box” Stores
Designers shy away from too many “big box” purchases, because rooms entirely outfitted in furniture from the same store can come across as generic. With that said, there are plenty of “big box” stores I love to shop for select items!
Pottery Barn is a big box classic, but sometimes they have the perfect piece
Yep, that’s right — even designers shop at these stores! I love finding diamonds in the rough at an incredible price.
Target is great for home accessories, including affordable wall decor, side tables, and kitchenware
Ikea offers wonderful closet systems and affordable streamlined furniture
Vintage Shops
Sometimes, there’s just no substitute for a good vintage piece. I have a few go-to spots when I’m looking to bring in some old charm! Another good spot to look for antiques is local estate sales.
And there you have it — a complete list of stores if you want to shop like an interior designer! Most of us love to mix and match from a variety of vendors to create a space that feels totally unique.
As you shop, don’t be afraid to get creative! You might stumble across a color or texture combination as you put together your mood board that immediately feels right, or you might be drawn to a furniture piece in a style you never knew you liked. That’s the beauty of shopping, planning, and mapping things out — you might even surprise yourself with a gorgeous new idea. Happy shopping!
This post may contain affiliate links, please read my disclosure policy.
Share
It’s easier stay hydrated when your H2O tastes and looks like a fruity summertime treat. Here’s how to infuse your water with fruit, herbs and more, featuring one of our favorite berry combinations – black cherries and blueberries.
Let’s admit it – It’s really hard to get those 8 glasses of water in a day. Personally, I am terrible at drinking enough water, despite trying to maintain a relatively healthy diet. Other than having a major weakness for homemade dessert, water consumption is one of my greatest health related weaknesses and a major player in the midday headaches I sometimes experience. (Sidenote: I consider my love for desserts like chocolate chip cookies, more of an appreciation than a weakness.)
That’s the beauty of fruit-infused water. You get all of the benefits of drinking water with far more flavor. Infusing water with the essence of fruits, herbs, and other botanicals helps you stay hydrated without the downside of excess calories, sugars, and artificial flavorings. It’s just like drinking water – refreshing and thirst-quenching – but better. It’s also super easy and inexpensive.
One of our favorite infused water combinations is mint, black cherries and blueberries. This berry infused water recipe takes 10 minutes and uses only 5 ingredients! Not to mention, it’s beautiful appearance makes it a great option for your next party or family gathering.
But there are a few things you should know before you make fruit, herb or even vegetable infused water so it tastes as good as it is good for you.
How to Make Fruit Infused Water – Our Best Tips
Making fruit infused water is pretty simple. Place the water in a pitcher or a bowl, add your ingredients, stir and chill for a few hours or overnight. Before serving give the water a stir and pour over ice. Then garnish with additional fresh ingredients if desired.
Prepping Your Ingredients
Choose organic fruit if you can. Wash all your produce to remove dirt and pesticides even if you plan to peel them. Dirt can get dragged into the fruit when you cut into it. I recommend cutting up most fruits, since it will add flavor quicker. Softer fruits like citrus and strawberries can be sliced thick, thin, halved, or quartered. Harder fruits like apples should be sliced very thinly because they take longer to release flavors. It helps to crush leafy herbs like mint, basil, and cilantro to release their oils, while loose herbs and flowers can be corralled in a tea infuser. You can leave berries, like the ones used in the berry infused water recipe below, whole.
Party Note
We love using citrus fruits and whole berries for larger gatherings because they look beautiful even after a few hours, while melons and sliced strawberries will started looking waterlogged. But beware, when using citrus fruits, like oranges, the water can get bitter over time. Try infusing the citrus water in the fridge for a 3-4 hours. Then before serving discard and replace the citrus with fresh fruit for a beautiful look.
Soak Time and Temperature
You can use tap or filtered water but make sure it’s cold or room temperature water. Hot water makes produce fall apart faster and can compromise the produces nutrients.
Don’t keep fruit infused water unrefrigerated for more than two hours. Fruit, like any fresh food, will spoil quicker when left out. Keeping it in the fridge when it’s not in use will prevent bacterial growth.
Refill your infused drink with additional water periodically as you drink it. It will be weaker than the first sip, but still delicious.
Infused Water Combinations
You can really use whatever fruit you have on hand to make infused water. You can use lemon, lime, blueberries, raspberries, pineapple or grapefruit. The list is endless! Don’t be afraid to experiment with spices and herbs, like ginger, cinnamon sticks, rosemary, basil, cilantro or even lavender. Vegetables aren’t out the question either. After all, cucumber is an infused water staple.
Here are some combinations we love:
Lemon + raspberry + rosemary
Strawberry + lemon + basil
Cucumber + orange
Lemon + thyme
Orange + blueberry + basil
Cucumber + mint + jalapeno
Orange + cinnamon + cardamom + cloves
Watermelon + mint
Blueberry + mango
Grapefruit + rosemary
Infused Water FAQS
Which fruits should I use if I want to quickly flavor water?
Cucumbers, citrus fruits, melons, and mint flavor water almost immediately. Avoid apples, cinnamon and rosemary as they need an overnight soak in the fridge.
Can you eat the fruit after infusing water?
You can use the leftover fruits to prepare lots of different recipes. Add it to your morning oatmeal or blend into a smoothie.
How long can you keep fruit infused water in the fridge?
You can keep the fruit in the water for 24 hours. After that strain out the solids and refrigerate for up to 3 days.
Is fruit infused water healthy?
It’s pretty much as healthy as it gets. It’s made with only water and fruit, so it’s a great substitute for soda, juice or other artificially sweetened drinks. The recipe below uses the natural sweetener Stevia, but it’s not necessary. Skip it for a completely unsweetened drink.
Can you use frozen fruit when infusing water?
Yes! I generally prefer to use fresh fruit, but frozen fruit works great too. Frozen fruit is a great option in the summer, when you crave a colder, more refreshing drink.
If you use this recipe to stay hydrated please come back to share using my 5-star rating in the comments below! Or if you come up with your own winning share it with us here or on Instagram!
Hungry for more recipes and home tips? Sign up for my newsletter to get amazing content sent directly to your mailbox.
This fruit-infused berry water recipe is a delicious and colorful way to stay hydrated, especially in summer. Eat the fruit for a high-fiber and hydrating vegan drink!
A Charming Refresh for A Traditional & Bright Primary Bathroom
This post may contain affiliate links, please read my disclosure policy.
Share
Childhood Home Take Two
We took my parents’ old-school primary bathroom down to the studs to give it a fresh new life with charming touches. Photography by Jill Ockhardt Blaufuss
I used to think there was nothing more personal than designing your own home. That is, until I started renovating the house I grew up in. Our #childhoodhometaketwo project has brought back so many good childhood memories, and it’s teaching me how to honor my roots even as I bring my present-day style into the design choices. What is it like when your parents are your design clients? As it turns out, it’s a ton of fun. I prepped with an entire lifetime of onboarding, after all—so I was excited to design a bathroom that was perfectly suited to their design taste and current needs. Without further ado, let’s take a peek into the Bluemont Bath.
The Structure
Looking at the blueprint of this space, it was pretty clear to us that we wanted to give ourselves a blank slate, without wiping away its original charm. We didn’t change the footprint of the bathroom at all—the layout actually still worked perfectly. We were able to save a lot of money by keeping plumbing and finishes in the same location.
Some pretty extensive water damage meant that we had to take the entire room down to the studs. We mapped out a plan that modernized the space without creating a stark contrast between this bathroom and the rest of the house’s classic style. Our goal was to update everything without the room feeling too recently updated.
The Colors
We wanted to pay homage to the original blue and yellow color palette, especially since it repeats in the adjoining bedroom. We did that by opting for satin Benjamin Moore paint in Cloud White for the walls and selecting blue accents, brass shelving, and nickel finishes to tie in the original color scheme. Our amazing contractor, Rick Halvorson Construction, added delicate picture frame molding to the walls, which added a traditional touch without feeling dated.
We got to use so many incredible materials in this space, but I can’t get enough of the custom flooring. The bathroom is pretty large and open, so I wanted something that would brighten the room and add a modern pattern without making things feel busy. As soon as I saw a photo of this subtle checkerboard pattern, I was sold—and thankfully, so was my mom. It’s a perfect fresh take on a traditional look.
But turning our inspiration to reality turned out to be one of the biggest challenges we faced in this space. We wanted to source the flooring materials from a local company we love, but everything we sampled was too big or too high contrast. We finally found two porcelain tile colors that matched our vision perfectly, only to discover they weren’t made in the size we needed.
Our flooring company, Fargo Linoleum, worked with us to come up with a custom, creative solution—we purchased the 12×24 porcelain tiles in the colors satin Stellar Gray and satin Diamond Carrera, and had them custom cut onsite to the 12×12 squares you see pictured here. It was quite the process, but we don’t regret it at all! Personally, I think the floor brings the entire room together.
The soaking tub is gorgeous, but I also can’t get enough of the shower! The combination of our floor and wall tiles made such a uniquely beautiful spot.
We also adore our cabinets from Country Classic Cabinets—they bring the perfect amount of warmth to the space and pair perfectly with the Quartz countertops. The soft white oak cabinets tie in with the yellow oak cabinets in other rooms. They flow right into the home’s original design while also bringing the primary bath into the present.
And those Quartz countertops I mentioned? They look like soapstone, which is one of my favorite materials to use in personal projects. My mother doesn’t necessarily share my fondness for the “patina” that I believe makes natural stone so gorgeous. She also wanted a maintenance-free option. To meet her needs, we sourced a beautiful quartz that would fool most into believing it’s real deal soapstone. My mom and I are both super pleased with the final look.
The Finishes
Brass sconces and nickel RH mirrors created a mixed metals look that is somehow modern and totally classic. I love mixing finishes—there’s something about that contrast that keeps your eye moving throughout the entire space. We opted for brass lighting and accessories while selecting nickel hardware and fixtures.
In the soaking tub alcove, the golden-framed art balance the aged brass open shelving to create visual harmony across the open space. We couldn’t be more pleased with the result! Everything doesn’t need to match for everything to flow.
The Final Details
The most unique piece in this room: the curtains! I spotted William Morris’s Mallow fabric on Etsy and immediately knew it was the perfect fit for this project. When I contacted the seller, though, I found out that the fabric was intended to be sold in much smaller sections. On top of that, it was being discontinued! I was a little heartbroken, but I didn’t give up hope. After a few months, we got a miracle, securing the last bit of this fabric in the length we needed. These curtains are almost certainly the only one of their kind!
Perhaps my favorite detail of all: I’m wearing my mother’s favorite dress from when she was younger in my portrait. It’s about the same age as the original bathroom. She gifted it to me when the project was completed, and when I tried it on, we realized it matched the bathroom perfectly. In a way, I think that’s a wink to the evidence that this bathroom was completely customized to suit her taste—a modern classic, just like the dress that inspired it.
This post may contain affiliate links, please read my disclosure policy.
Share
This delicious, flakey crusted rustic blueberry lemon tart (galette) recipe is so easy to make. You don’t even need a pie pan to make it!
Rustic Blueberry Lemon Tart – a simple golden, flaky pie crust wrapped around freshly baked blueberries and seasoned with a touch of lemon, makes for a sweet breakfast or dessert. This blueberry galette also happens to pair perfectly with a coffee. While this baked blueberry tart is best served on the same day, you can keep it for up to 3 days. It’s a tart recipe easy enough for everyday and decadant enough for special events.
What makes this rustic blueberry tart recipe so good?
Do you love blueberries? This tart recipe is a keeper for fresh blueberry lovers. Fresh juicy blueberries are baked in a crisp and flaky crust for an open faced dessert that’s as delicious, as it is easy. It’s truly a breeze to make. The free-form pie crust take the stress out of baking. It so simple, even kids can help form and fold the home-made tart crust.
I love incorporate fresh fruits into my recipes. Recipes like my easy raspberry mousse and pineapple guacamole are quick and easy ways to enjoy fresh fruit for summer or year round!
A tart is an open pie that’s usually filled with sweet and savory fruits or custard. A rustic, free-form fruit tart, baked directly on a lined baking sheet rather than in a tart pan is often called a galette.
What can I serve my Rustic Blueberry Lemon Tart (galette) with?
You can serve it with whipped cream, vanilla ice cream, or a cup of your favorite coffee.
Can I use frozen blueberries?
You certainly can, but I have found that the best pies are made with fresh berries. Thawing your frozen blueberries isn’t necessary but you will need to use tapioca flour instead of cornstarch. Tapioca flour will keep the pie from being runny.
What are the best kind of blueberries for this pie?
Small fresh blueberries are perfect for this rustic blueberry tart pie.
When is the best time to make blueberry lemon tarts?
Right now is the best time! Another good time to make it is during the blueberry season which is between June and August. Also, if it’s pear season, you can absolutely make yourself a rustic pear tart instead!
Can I use a muffin tin to make my tarts?
Yes, you certainly can make individual tarts using a muffin tin. Kids love them! This recipe is meant for a rustic pie which means that you don’t need any special equipment like a pastry blender, stand mixer, or pie pan! It’s also an easy recipe to make with your kids.
Can I use a pre-made pie instead of a homemade crust to make lemon blueberry tarts?
If you’re in a hurry, you can use a puff pastry like Pillsbury pie crust but the best tasting pie crusts are homemade. They are way easier to make than you think.
Why do I need to mix flour and cornstarch with the blueberries?
Both flour and cornstarch act as thickeners and keep the pies from becoming too runny. Another thickener that is commonly used is tapioca. Use 1 tablespoon of Tapioca in place of cornstarch for this blueberry galette recipe.
Is it okay to use room temperature water instead of ice-cold water?
Ice cold water keeps the dough from developing gluten and ensures that the dough is flakey.
How long can pie dough last in the fridge?
In my experience, pie dough can last in the fridge for a maximum of 3 days. Any longer than that will result in a pie that cracks easily and is hard to handle when you roll it out.
How to Make a Rustic Blueberry Tart
Step 1
In a small mixing bowl, combine all-purpose flour, white sugar, salt, as well as grated cold butter.
Step 2
Add half of the ice-cold water into the flour mixture and then mix. Slowly add the rest of the ice water and also mix. Continue until the dough holds together when you squeeze it.
Step 3
Form the pie dough into a ball and then press it into a flat 6-inch disk. Wrap it with plastic wrap and place it in the fridge for a minimum of 30 minutes. You can also keep it in the fridge overnight.
Step 4
In a medium bowl place the blueberries, flour, sugar, lemon juice, and cornstarch. Gently toss them together until they are evenly coated, then set the mixture aside.
Step 5
Preheat your oven to 400 degrees and then place a piece of parchment paper on your work surface. Dust the paper with a little flour and place the chilled dough disc on it. Lightly dust the top dough with flour as well.
Step 6
Cover the dough disc with parchment paper. Using the pin, roll it out evenly into an 11-12-inch circle that’s 1/8 inch thick. This will be about the thickness of 2 stacked quarters.
The edges of the dough might crack while you do this. If they do, don’t panic. Just try and push them together or fill them in with uneven pieces of the dough.
Step 7
Place the blueberries in the center of the pastry dough. Leave a 1 1/4 – 2-inch border. Proceed to fold the edges up into pleats using your hands or with the help of the parchment paper. Next, lightly brush the top of the crust with the egg wash and sprinkle it with coarse sugar. Place a few slices of butter on top of the blueberries if you like.
Step 8
Transfer the tart onto a baking sheet and then into the oven. Bake the tart at 400 degrees for 40-50 minutes or until the flaky pie crust is golden brown. Let your blueberry tart cool down on a wire rack and enjoy your rustic tart with a scoop of vanilla ice cream.
I’m so honored when you make my recipes in your home. If you try my rustic blueberry tart recipe, please come back to share using my 5-star rating in the comments below!
Looking for more recipes or lifestyle tips? Sign up for my newsletter to get amazing content sent directly to your mailbox.
In a small mixing bowl, combine all-purpose flour, white sugar, salt, as well as grated cold butter.
Add half of the ice-cold water into the flour mixture and then mix. Slowly add the rest of the ice water and also mix. Continue until the dough holds together when you squeeze it.
Form the pie dough into a ball and then press it into a flat 6-inch disk. Wrap it with plastic wrap and place it in the fridge for a minimum of 30 minutes. You can also keep it in the fridge overnight.
In a medium bowl place the blueberries, flour, sugar, lemon juice, and cornstarch. Gently toss them together until they are evenly coated, then set the mixture aside.
Preheat your oven to 400 degrees and then place a piece of parchment paper on your work surface. Dust the paper with a little flour and place the chilled dough disc on it. Lightly dust the top dough with flour as well.
Cover the dough disc with parchment paper. Using the pin, roll it out evenly into an 11-12-inch circle that’s 1/8 inch thick. This will be about the thickness of 2 stacked quarters. The edges of the dough might crack while you do this. If they do, don’t panic. Just try and push them together or fill them in with uneven pieces of the dough.
Place the blueberries in the center of the pastry dough. Leave a 1 1/4 - 2-inch border. Proceed to fold the edges up into pleats using your hands or with the help of the parchment paper. Next, lightly brush the top of the crust with the egg wash and sprinkle it with coarse sugar. Place a few slices of butter on top of the blueberries if you like.
Transfer the tart onto a baking sheet and then into the oven. Bake the tart at 400 degrees for 40-50 minutes or until the flaky pie crust is golden brown. Let your blueberry tart cool down on a wire rack and enjoy your rustic tart with a scoop of vanilla ice cream.
This post may contain affiliate links, please read my disclosure policy.
Share
This easy egg-free raspberry mousse recipe is perfect for any occasion! Its elegant look and decadent flavor will impress your family, guests, and friends.
This creamy raspberry mousse has such a nice spring vibe, plus it’s easier than you’d think to make. It’s a simple eggless mouse is made with only 4 ingredients (not counting water) and requires no bake. It’s smooth, pretty and that pink color is all-natural.
You probably already have most, if not all the ingredients, on hand, making it perfect for those times you decide to have friends over for dinner and need something quick and simple for dessert so you can focus on the main course! I also love it for Easter, but this creamy, smooth dessert works for really any occasion.
With spring approaching, I’ve been on a real fruit kick, even incorporating cranberries into sourdough bread. I’ll be sharing more fresh fruit recipes like this one soon.
Ingredients in Raspberry Mousse
Fresh or frozen raspberries: I use fresh raspberries to garnish the mousse and frozen raspberries to sweeten and add that beautiful pink color to the whipped cream or cool whip.
Sugar: Used for sweetening the mousse. Feel free to use honey, maple syrup, or stevia. You can choose not to use sugar if you’re sweet enough.
Unflavored gelatin: This helps the whipped cream or cool whip keep its shape.
Water: It’s used to help thicken the gelatin powder as well as help puree the raspberries.
Cool whip: I usually use the original one. Sometimes I buy the non-dairy version by So Delicious. If you don’t like cool whip you could make your own whipping cream by whipping cold heavy cream with a whisk or blender until stiff peaks begin to form.
Does this recipe require raw eggs or egg yolks to make?
No, this easy raspberry mousse recipe is egg-free.
Can I chill this mousse and use it as a cake filling?
You certainly can! If you do, you might have to cut the recipe in half because the amount of mousse this recipe makes is a lot.
Can raspberry mousse be made ahead of time?
Yes! Making it ahead of time and keeping it in the fridge results in a raspberry mousse that’s bursting with flavor.
How far ahead can I make a raspberry mousse?
You can make it 2 days ahead if you are preparing for a special occasion like Easter or Valentine’s Day.
Can I freeze raspberry mousse?
I haven’t tried putting it in a freezer mostly because my family usually gobbles it up before I can even think of freezing it!
Can I use the same recipe for strawberries?
I haven’t tried, but I don’t see why not! If you do, let me know how it goes in the comments.
Can coconut cream be substituted for heavy cream?
Absolutely. Coconut cream is perfect for people who are lactose intolerant. Coco whip by So Delicious is a great coconut cream alternative.
Can I make this into vegan raspberry mousse?
You can turn this into vegan raspberry mousse by using a non-dairy based whipped cream and by substituting the gelatin for agar-agar.
Do I have to use frozen raspberries?
Fresh raspberries are perfectly fine. Your mousse will also have a fresh raspberry flavor!
Can you replace the sugar with maple syrup or a liquid sweetener like stevia?
Yes, you can replace sugar with maple syrup as well as natural sugars like stevia. If you do, be sure to adjust it to taste.
Presentation
For a layered look make an additional 1/2 batch of the raspberry puree. After cooling in fridge, pipe or spoon between layers of raspberry mousse.
When can I make this recipe?
Raspberry Mousse is the perfect Easter and Valentine’s Day dessert. You can also make it if you’re hosting a dinner party or having a special dinner. What’s great about raspberry mousse is that all you need to make it are simple ingredients and frozen or fresh fruit.
Other than fresh raspberries and mint leaves, what else can I use to garnish raspberry mousse?
Chocolate curls, chocolate shavings, and whipped cream are just a few of the things that you can top the raspberry mousse with.
How To Make Raspberry Mousse
Step 1 In a small bowl, add 1/4 cup cold water as well as gelatin. Stir and then set it aside to thicken.
Step 2 Thaw the raspberries and then place them in a food processor. Add 1/4 cup of sugar as well as 1/4 cup of water and puree.
Step 3 Place a fine sieve over a small saucepan and pour the raspberry puree into it. Using a spoon, stir and press the puree into the sieve and separate it from the raspberry seeds, which tend to be a lot!
Step 4 After that, add the gelatin mixture and place it in the saucepan over medium heat. Stir continuously until it comes to a boil. At this point, the gelatin will have been combined with the raspberry sauce.
Step 5 Remove the mixture from the heat and let it cool down to room temperature.
Step 6 In a large mixing bowl, add Cool Whip and gently fold in the raspberry puree with a rubber spatula.
Step 7 Using a piping bag or ziplock with its corner cut, pipe the raspberry puree into small glasses, a dessert bowl, or dessert cups.
Step 8 Garnish your raspberry mousse with fresh berries and mint. After that, place them in the fridge to chill for 2 hours, or overnight. Be sure to cover it so it doesn’t pick up all the scents that are in your fridge.
If you try this recipe, please come back to share using my 5-star rating in the comments below! Above all, I love to hear from you guys and always do my best to respond to each and every comment
Hungry for more recipes and home tips? Sign up for my newsletter to get amazing content sent directly to your mailbox.
This Easy egg-free Raspberry Mousse recipe is perfect for any occasion! Its elegant look and decadent flavor will impress your family, guests, and friends.
In a small bowl, add ¼ cup cold water as well as gelatin. Stir and then set it aside to thicken.
Thaw the raspberries and then place them in a food processor. Add 1/4 cup of sugar as well as 1/4 cup of water and puree.
Place a fine sieve over a small saucepan and pour the raspberry puree into it. Using a spoon, stir and press the puree into the sieve and separate it from the raspberry seeds, which tend to be a lot!
After that, add the gelatin mixture and place it in the saucepan over medium heat. Stir continuously until it comes to a boil. At this point, the gelatin will have been combined with the raspberry sauce.
Remove the mixture from the heat and let it cool down to room temperature.
In a large mixing bowl, add Cool Whip and gently fold in the raspberry puree with a rubber spatula.
Using a piping bag or ziplock with its corner cut, pipe the raspberry puree into small glasses, a dessert bowl, or dessert cups.
Garnish your raspberry mousse with fresh berries and mint. After that, place them in the fridge to chill for 2 hours, or overnight. Be sure to cover it so it doesn’t pick up all the scents that are in your fridge.
Notes
Storing: You can keep it stored covered in the fridge for up to 2 days.Presentation: For a layered look, make an additional 1/2 batch of the raspberry puree. After cooling in fridge, pipe or spoon between layers of raspberry mousse.
This post may contain affiliate links, please read my disclosure policy.
Share
This hearty cranberry sourdough bread is made even more decadent with the addition of dark chocolate. This recipe delivers a rustic cranberry bread that’s soft, chewy, slightly sweet and a little tart. In summary, it’s delicious!
Baking sourdough bread is not a fast process, but patience is a virtue! Most of the time is spent hands off, and I promise the results are worth it! Our chocolate cranberry sourdough bread recipe is as delicious as it is versatile. In the morning, I like my chocolate cranberry bread with a fresh cup of coffee, toasted and slather it in butter. Then in the evening, it pairs beautifully with a glass of white wine and fancy cheese.
If you are just getting started with your sourdough journey, you might read the recipe below and think what is a sourdough starter and how do I get it?
Put simply, a sourdough starter is what makes sourdough bread rise. Instead of using active dry yeast like in other bread recipes, a leavening agent composed of fermented flour and water uses natural occurring yeasts and bacteria makes the bread rise.
There are a few ways to get a sourdough starter. You can ask a friend who keeps a starter for a 1/4 cup or so of theirs, you can buy it online, or make your own.
While it’s not difficult to make your own sourdough starter from scratch, it does take some time. The overall process takes about 7 days (or more).
You certainly can. I usually add mine at the beginning of the mixing process. Doing this ensures that all of the ingredients in the bowl are evenly distributed.
Why is my dough not doubling?
Don’t fret if it doesn’t double like bread made using commercial yeast. Sourdough typically takes longer to rise. It also tends to rise faster in a warm room and slower if it’s in a cold room. I usually put my dough in an oven that’s turned off but has the pilot light on. The oven creates a controlled environment and the pilot light keeps the oven warm.
Can I use fresh cranberries for this recipe?
Fresh Cranberries tend to be tart. I wouldn’t recommend it unless you don’t mind if your loaf is kind of tart.
What should my cranberry sourdough bread look like at the end of bulk fermentation?
The dough should have a dome-like shape on its edges, and it should also have almost doubled in size. It should also be jiggly if you shake it.
Why should I use a Dutch oven?
Dutch ovens are perfect for baking bread at home. They do a great job trapping in the heat and moisture and also form steam. This steam is important because it helps the bread inside the oven rise.
What does chocolate cranberry sourdough bread go with?
It goes perfectly with white wine, butter, as well as fancy cheese like goat cheese.
Can I use nuts instead of sweet fruit like cranberries?
Absolutely! You certainly can add slivered almonds, earthy walnuts, or hazelnuts. You can also use dried fruit like berries and raisins instead of cranberries.
Can I substitute the dark chocolate chips for milk or white chocolate?
Of course! If you do, please let me know how it goes in the comments!
What do I do if my crust comes out too dark?
Reduce the oven temp by 30° the next time you bake your bread. If that still doesn’t help, carefully cover the top of the bread with foil halfway through the baking process.
How can I keep the bread from spreading out after scoring it?
Putting the cranberry chocolate sourdough in the freezer for about 20 minutes will get it firm enough to be scored. It will also help it spread less after being scored.
How do I keep the bottom of the loaf from becoming too dark?
I’d put a baking pan or baking stones on the bottom rack. This will help.
Can I soak the fruits and nuts in water before mixing them into the dough?
Absolutely. All you need to do is soak them in warm water for about 5 minutes and then drain them. You can then mix them into the dough.
Is it okay to add commercial yeast to the dough to speed up the process?
Yes, it’s okay. I would add about ¼ teaspoon to it.
Can I freeze cranberry sourdough bread after I make it?
You totally can. All you need to do is wait for it to cool down completely and then wrap it really tight with plastic wrap. After that, place it in a gallon freezer bag. The bread will keep for 3-4 months.
How do I thaw frozen bread?
Preheat the oven to 350 degrees, then unwrap the bread and place it on a baking sheet lined with parchment paper. Bake it in the preheated oven for 20 minutes and you should be good to go.
What do I do if my dough is too dry or too wet?
Just add about a tablespoon of water if it’s too wet or a tablespoon of flour if it’s too dry. Add until it gets to the desired consistency.
Tools Needed for Chocolate Cranberry Sourdough Bread
This chocolate cranberry sourdough recipe is best made over the course of two to three days. I highly recommend baking this delicious sourdough bread over a longer time period as the cold rising of the dough adds significant flavor. However, you could also opt to bake the bread over one day.
I provided a sample timeline for the quick bake and a slower and steadier bake below. The examples below feed the sourdough starter the same day as mixing the ingredients, but for a more flexible timeline, feed the starter the evening before.
How to Make Cranberry & Chocolate Sourdough Bread
Step 1 FEED SOURDOUGH STARTER 7:00 am (Day 1)
Ingredients:
50g Active sourdough starter
100g Whole wheat flour
100g Room temperature water
Typically your starter will be ready 4-8 hours after feeding. At that point, it will have doubled or tripled in size and have plenty of bubbles on the surface and throughout the culture.
Step 2 MIX INGREDIENTS
12:00 pm
In a large bowl, mix the dry ingredients. Then, mix the wet ingredients using your hands, a rubber spatula, or a wooden spoon. Make sure all the ingredients are well combined and your dough feels wet and shaggy.
Step 3 LET DOUGH REST
12:10 pm
Cover the large bowl with a tight-fitting lid or plastic wrap. Then let the dough rest at room temperature or in a warm place for about 30 minutes.
Step 4 DO A SERIES OF STRETCH & FOLDS
12:40 pm
After 30 minutes, stretch up the North side of the dough and then fold it over its middle. Give the bowl a quarter turn and repeat the stretch and fold around 5 times or until the bowl comes full circle. Cover the bowl with a lid or saran wrap and do a second stretch and fold. Wait 10 minutes then do the last stretch and fold.
This step, known as stretching and folding, is important because it helps add oxygen into the dough. This step also strengthens the gluten in the dough.
Step 5 LET DOUGH RISE
1:00 pm
Let the dough rise for 2-3 hours at room temperature and then put the chocolate cranberry sourdough bread in the fridge overnight, or for 3 hours. The dough will rise slowly and also develop flavor.
Step 6 SHAPE THE DOUGH
6:00 pm / 12:00 pm (Day 2)
On the next day or after 3 hours, lightly flour your work surface and then scoop out the bread dough. Divide the dough in half and then grab one side of the dough. Pull it out so it builds some tension, and gently bring it toward the dough’s center. Be sure to handle the dough gently but firmly so as not to de-gas it. Repeat the same action on the other side of the dough as well as the other two sides.
Step 7 FORM A BALL
6:10 pm / 12:10 pm
Flip the chocolate cranberry sourdough over so the seam side is down and lightly dust the top of the dough with flour. Seal the seam underneath the dough by cupping the dough with your hands. Rotate the dough using quarter turns in a circular motion while bringing it towards you. This motion will create tension on the surface of the dough and form it into a smooth tight ball.
Step 8 DUST THE DOUGH
6:15 pm / 12:15 pm
Next, dust a bread basket with rice flour or rye flour mixed with all-purpose flour. Dust the top of the ball with flour as well. If you don’t have a bread basket, feel free to use a bowl or loaf pan. Transfer the dough into the basket seam side up. This mixture will help prevent the dough from sticking to the basket.
Step 9 REST THE DOUGH
6:20 pm / 12:20 pm
Put the dough in the fridge overnight, so it can develop a deeper flavor. You can also put it in the freezer for 20 minutes. This will make it firm and easy to score (slice) with a razor or bread lame.
Step 10 SCORE THE DOUGH
6:40 pm / 9:00 am (Day 2)
Preheat your oven temperature to 450 degrees. Next, flour your work surface and then place the dough on its, seam side down. Slash the top of the dough either at a 45-degree angle or straight down at 1/4 an inch depth using the bread lame or razor.
Dust the inside of the Dutch oven with the flour mix, then place the dough in it and cover it. Do the same for your second dough.
Step 11 BAKE THE BREAD
6:50 pm / 9:10 am
Return the Dutch oven into your preheated oven and bake the bread until it becomes deep golden brown. This will take about 40 minutes.
Step 12 REST THE BREAD
7:30 pm / 9:50 am
After 40 minutes remove the lid from the dutch oven and then proceed to set the timer for 5 minutes if the cranberry sourdough bread still hasn’t turned deep brown. Keep a close eye on the bread. After it gets to your preferred color remove it with a wooden spoon or spatula and let it cool on a wire rack.
Step 13 DEVOUR THE BREAD
8:30 pm / 10:50 am
Let the bread rest for about 1 hour or 2 before eating it. Bread that’s eaten immediately tends to have a chewy texture. If you really can’t wait, make sure you eat it with melted butter. Bread with melted butter is said to be divine.
I hope you enjoy! If you try my chocolate cranberry sourdough bread recipe, please come back to share using my 5-star rating in the comments below!
Looking for more bread recipes or lifestyle tips? Sign up for my newsletter to get amazing content sent directly to your mailbox.
This sourdough bread recipe pairs chocolate and cranberry for a taste that's decadent, soft, chewy, slightly sweet and a little tart. Pair this delicious cranberry bread with white wine, butter or fancy cheese.
Feed sourdough starter.See ingredients above. Typically your starter will be ready 4-8 hours after feeding. At that point it will have doubled or tripled in size.
Mix ingredients.In a large bowl, mix the dry ingredients. Then, mix the wet ingredients using your hands, a rubber spatula, or a wooden spoon. Make sure all the ingredients are well combined and your dough feels wet and shaggy.
Let the dough rest.Cover the large bowl with a tight-fitting lid or plastic wrap. Let the dough rest at room temperature or in a warm place for about 30 minutes.
Do a series of stretches & folds.After 30 minutes, stretch up the North side of the dough and then fold it over its middle. Give the bowl a quarter turn and repeat the stretch and fold around 5 times or until the bowl comes full circle. Cover the bowl with a lid or saran wrap and do a second stretch and fold. Wait 10 minutes then do the last stretch and fold. This step, known as stretching and folding, is important because it helps add oxygen into the dough. This step also strengthens the gluten in the dough.
Let the dough rise.Let the dough rise for 2-3 hours at room temperature and then put it in the fridge overnight, or for 3 hours. The dough will rise slowly and develop flavor.
Shape the dough.On the next day or after 3 hours, lightly flour your work surface and then scoop out the bread dough. Divide the dough in half and then grab one side of the dough. Pull it out so it builds some tension, and gently bring it toward the dough's center. Be sure to handle the dough gently but firmly so as not to de-gas it. Repeat the same action on the other side of the dough as well as the other two sides.
Form a ball.Flip the dough over so the seam side is down and lightly dust the top of the dough with flour. Seal the seam underneath the dough by cupping the dough with your hands. Rotate the dough using quarter turns in a circular motion while bringing it towards you. This motion will create tension on the surface of the dough and form it into a smooth tight ball.
Dust the dough.Next, dust a bread basket with rice flour or rye flour mixed with all-purpose flour. Dust the top of the ball with flour as well. If you don't have a bread basket, feel free to use a bowl or loaf pan. Transfer the dough into the basket seam side up. This mixture will help prevent the dough from sticking to the basket.
Rest the dough.Put the dough in the fridge overnight, so it can develop a deeper flavor. You can also put it in the freezer for 20 minutes. This will make it firm and easy to score (slice) with a razor or bread lame
Score the dough.Preheat your oven temperature to 450 degrees. Next, flour your work surface and then place the dough on its, seam side down. Slash the top of the dough either at a 45-degree angle or straight down at 1/4 an inch depth using the bread lame or razor. Dust the inside of the Dutch oven with the flour mix, then place the dough in it and cover it. Do the same for your second dough.
Bake the bread.Return the Dutch oven into your preheated oven and bake the bread until it becomes deep golden brown. This will take about 40 minutes.
Rest the bread.After 40 minutes remove the lid from the Dutch oven and then proceed to set the timer for 5 minutes if the bread still hasn't turned deep brown. Keep a close eye on the bread. After it gets to your preferred color remove it with a wooden spoon or spatula and let it cool on a wire rack.
Devour the bread.Let the bread rest for about 1 hour or 2 before eating it. Bread that’s eaten immediately tends to have a chewy texture. If you really can't wait, make sure you eat it with melted butter. Bread with melted butter is said to be divine.


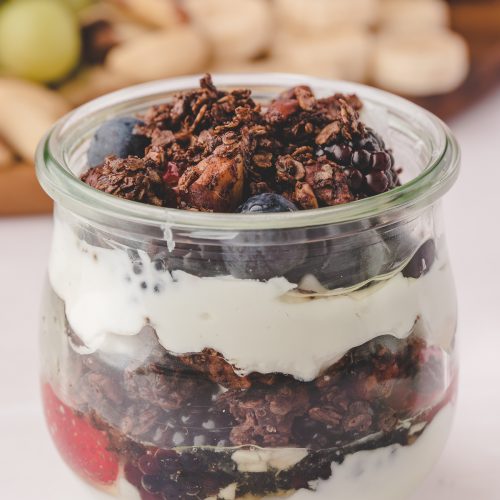


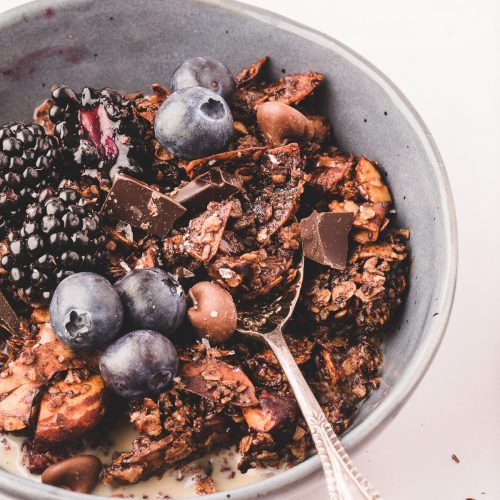


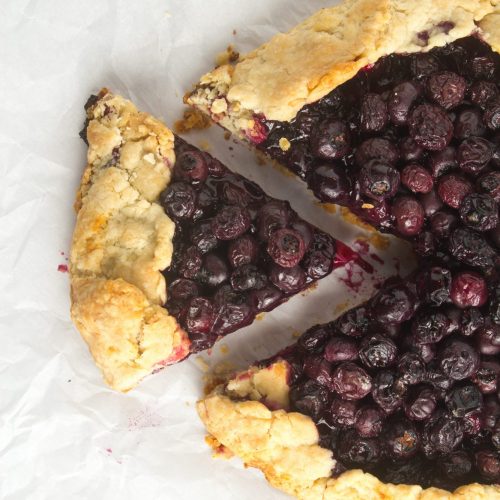


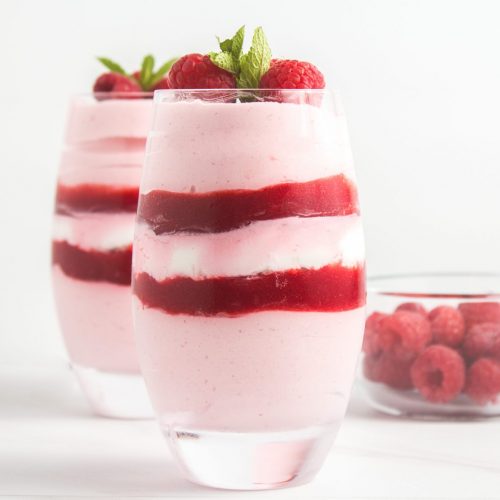


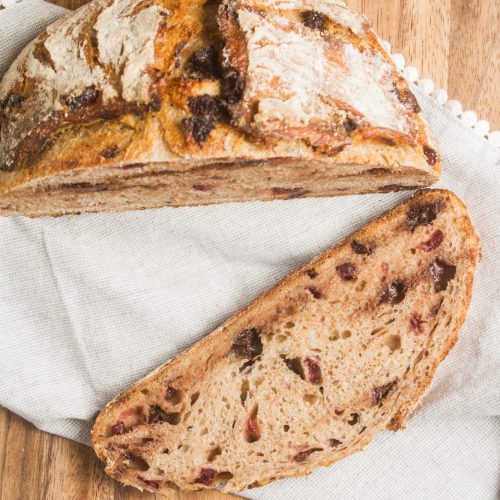
